Senin, 21 September 2009

Installing Modem

The first step to connect the internet modem is installed. Modem is an intermediary device between your computer with the phone line to connect to the ISP (Internet Service Provider - Internet service provider) you.

1. Click Start, select Settings, select Control Panel. Will display the Control Panel window.

2. In the Control Panel window, select the Modems icon and double click Install window appears so that New Modem (for those who have installed a modem before eating will appear Modem Properties window. If you want to add a new modem driver, click Add).


Windows can perform automatic detection of modem devices that have been installed on your PC, but it is limited to a modem that has been recognized by Windows. If you choose the automatic detection, then clear the box Do not detect my modem, and then press Next.
If you have a new type of modem driver files and accompanied (in floppy / CD-ROM), should you choose manual detection so as to take advantage of the latest features of the modem (eg ability to support 56 kbps, fax, voice, etc.). For that select the Do not detect my modem, and press Next.
3. On the next menu displayed a list of modems that have been identified and made available by the Windows driver. Select the appropriate modem type with your modem, and then press Next.
If you do not have the driver files, then you can choose Standard Modem type, such as the speed of 28,800 bps, and then press Next and you can directly go to step 5.


If you have a driver file (diskette / CD-ROM) provided by the manufacturer, then the pairs diskette / CD-ROM, and press the Have Disk button.
4. The next menu appears on the Install From Disk window. Insert the diskette / CD-ROM that contains your modem driver file, select the appropriate dirive (A: \ or select a CD-ROM, another location using the Browse menu).

5. If the driver files succeed in taking, then the window will appear on the driver (in this example, V90 modem drivers & K56Flex DATA-FAX-VOICE Modem, which has the ability s / d 56 kbps). Select the appropriate driver (if more than one), then press Next.


6. When finished, then you must specify the communication port (COM) where the modem is installed. For example, COM1 port chosen because usually a modem installed on the port (unless used for other media). Then press Next.


At this stage, if done correctly, then the modem will be installed on your PC. Click Finish to end setup your modem. Melakuan connection to the internet, you need to dial-up settings to specify your ISP's phone number that provides Internet access. How to make a dial-up settings can be seen on this page.
Having completed this stage, you can dial-up settings.

Rabu, 16 September 2009

Maxtor OneTouch 4 Plus 750GB

Large Capacity for Backup
In addition to carrying data, external storage devices can also be used to backup data from your computer. This backup function is highlighted by the series of Maxtor OneTouch 4 Plus. OneTouch 4 Plus is composed of several variants based on the capacity carried. One of them is the Maxtor OneTouch 4 Plus 750GB.

750GB
With hard disk 3.5 "750GB, Maxtor 750GB OneTouch 4 Plus offers a great capacity for now. In addition to 750GB, Maxtor also offers a variant with a capacity of 250GB, 500GB, and 1TB.

USB 2.0 and FireWire
Maxtor OneTouch 4 Plus 750GB using a USB 2.0 interface and FireWire (IEEE 1394a). According to Maxtor, sustained transfer rate of 43MB obtained / s (FireWire) and 33MB / s (USB 2.0). This is more than enough for backups. For buttons, this device is only equipped with 1 button called OneTouch. He took power directly from the netting through an included adapter.

1.11 kg
Maxtor product has a mass of 1.11 kg with a size of 63.5 mm x 152.4 mm x 171.45 mm. Quite large and heavy when compared to external storage devices that use hard disk 2.5 ". This confirms its function for backup.

Maxtor OneTouch
In the PCplus package received, the device has been contained Maxtor Maxtor OneTouch. This software is intended to utilize this device in an optimal, from managing OneTouch button, set the power settings, backup, restore (restore) files, synchronization, to set the security / encryption. Maxtor OneTouch lets you backup simply by pressing the OneTouch button.

Maxtor SafetyDrill
Maxtor share include a CD called Maxtor SafetyDrill Recovery. This software works Maxtor claimed to restore the entire contents of your PC hard drive boot, when the system failure. Previously you had to make sure that the CD can be run correctly on the PC in question and make copies of your boot disk on the Maxtor OneTouch 4 Plus 750GB.

Conclusion
Maxtor 750GB OneTouch 4 Plus is an external storage device that is more dedicated to backups. With the Maxtor OneTouch software, this device offers ease of use and security. (cgs)

Test Results
HD Tach RW 3.0.1.0 Long Short Test Test
Random Access 13.37 ms 13.27 ms
CPU Utilization 0% (± 2%) 0.67% (± 2%)
Average Read 34.9 MB / s 34.9 MB / s
Average Write 22.67 MB / s 27.4 MB / s
Burst Speed 35.07 MB / s 35.17 MB / s

HD Tune 2:53
Minimum Transfer Rate 27.43 MB / s
Maximum Transfer Rate 27.8 MB / s
Average Transfer Rate 27.7 MB / s
Access Time 13.2 ms
Burst Rate 27.8 MB / s
CPU Usage 11.73%

PCMark2005 120 (NTFS)
HDD (Overall) 3568
HDD - XP Startup 8.11 MB / s
HDD - Application Loading 6.88 MB / s
HDD - General Usage 5.49 MB / s
HDD - Virus Scan 29.43 MB / s
HDD - File Write 26.42 MB / s

www.maxtorsolutions.com

Devices used
Athlon 64 FX-57 (2.8 GHz)
Gigabyte GA-K8VT890-9 (F5)
Kingston 512MB DDR-400 (SPD) x 2
Asus GeForce 7950 GT 512MB
Seagate 7200.7 80GB SATA
Asus DVD 16x
Antec 550W
ViewSonic P95f +
USB 2.0
Windows XP SP2
VIA Hyperion Pro 5.15a
DirectX 9.0c
nVidia ForceWare 169.21

Harddisk Problem Solution 2: Windows Severe Damage


Cases around the hard drive more often than Windows on the hard disk is badly damaged so that we can not enter into it. In such cases, the only solution is to reinstall Windows. The problem, often in the hard disk or partition containing Windows is still there are many important files that must be saved. Then, how it?
Use a bootable applications, and can explore (browse) a file on disk is problematic. Again, you can use the Disk Rescue 9.0 Express which we discuss in the first part of this serial article. Very easy to use, you simply follow the wizard (the wizard) from the menu File Transfer Wizard. Unfortunately, this free version can not move these files to CD / DVD. So, you must copy the files to a flash or external hard drive.
Rescue Disk Express but can only work from the CD. If you prefer the process of the flash, use a portable Linux operating system that can boot from flash (live-USB). Almost all Linux distributions have a portable version, but it should be noted that the mounting process (introduction of hard disk contents) often must be done manually. Therefore, we recommend using Puppy Linux distributions because these distributions do the automatic mounting. Size Puppy Linux also only 100MB, so the fit on the flash is small size.
Application Express 9.0 Rescue Disk can be free Download here (46MB), while Puppy Linux you can get here (100MB).

Tricks : In order Document Not Lost


There are a few tips that documents are not lost. No need things too technical. Enough computing habits have changed.

In Windows, there is a folder named "My Documents". Folder that was naturally there in Windows, as Microsoft made a place for users of Windows to store documents.

By default, the folder it was in a drive with the operating system-not something that is safe. Why not secure? Because when the affected operating systems, can be documents in that folder also disrupted, inaccessible even at all.
If the document can not be accessed again, people can panic, and then pick up the phone, call us, asking how to get the documents again. Yes, that's the question that the last few days we received over the phone.
Hence, this time we give a tutorial to prevent data loss. The aim let as the saying goes "umbrella ready before it rains". But, this tutorial does not guarantee one hundred percent secure data. But, at least, minimize the risk of losing data.

Do not Save Data in Drive Operating System
This issue was discussed a bit in the beginning "story" was. Where the position of the operating system? Usually in C, is not it? Could also in D, if the computer has two operating systems. Anyway, going wherever the operating system, do not store the data in it.

There are just problems that can attack the operating system, such as viruses and corrupt files. Sometimes the right solution to solve the problem is to reinstall the operating system.

The solution, if you have two hard drives, save the data on the hard disk that is different from the hard disk that contains the operating system. If you only have one hard disk, create a special partition for storing data.

If you still feel scared in the usual hard disks, consider buying an external hard disk. Well, on some external hard disk, a feature for back-up data. It features a software that will automatically back-up of data that has been determined and the location was also determined.


Back-up Schedule
Determination of different storage locations to the new operating system one way. But remember, the hard disk can be damaged. Therefore, in addition to stored on your hard disk, store the data elsewhere, eg in keeping DVD. However, DVDs can be scratched, so it can not be read?

If a back-up or less, for some. If the pieces of DVD feels not enough, find it online storage website. Many web sites online data storage service, ranging from free to expensive.
One website that has free storage service is iDrive (www.idrive.com). This web site provides a space for 2GB. IDrive also provides software to facilitate file transfer. Let me more clearly, one day we discussed this website.


Caution Copying New Files
Would have copied the files, eg from a USB flash disk (UFD) to the hard disk? Be careful. Not only viruses that need to be considered (if the virus problem would still have a concern), but also the name of the file.

Do not let, files copied from a UFD, and other media, "overwrite" existing files on your hard disk. Different if it had been intentional. But, if unintentional, can cause other files missing.

For example, there is a file "planning.doc" which contains a PC purchase plans copied from the UFD to the folder D:-documents on the hard disk. In fact, there already exists a file named the same but the contents notebook purchase plan. Is, if only from the UFD file overwrite files on the hard disk, means loss notebook purchase plan.

Move "My Documents"
Folder "My Documents" should be used to store documents. But, in fact there are tips that do not store documents on it. The reason lies in that folder the same drive with the operating system drive. High risks to save the file in the drive operating system. When the operating system problems and should be reinstalled, the file can be lost.

One solution is to save the file on another drive. Redundant "My Documents" it? Well, yes. But, actually we can refer to another folder as the folder "My Documents". Later, the position remains the same folder in Windows Explorer. But actually, the folder was on another drive. This way.

1. Open Windows Explorer.
2. Right click on the [My Documents] on click [Properties].
3. Click [Move ...].
4. When the window to browse, find the folder containing the documents.
5. Click [OK].
6. Close the Properties window.
7. Done.

Overcome Bad Sector in Hard Disk


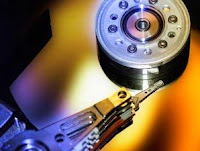
One time, a colleague to check the condition of a hard disk with a software. He felt the hard disknya are wrong. Apparently, he was right. Device test results stated that there is a part or a particular sector on the hard disk is damaged (bad sectors), and the worry of damage. Devices were also told that he should be prepared to replace the hard disk because of the possibility of a huge crash.

Well, it was necessary to replace the hard disk? What has not improved?

Shipping, it's worth trying to fix the hard disk first. Who knows still be able to work again. Understandably, most of the hard disks at the sector now has a backup. devoted to this condition. If you could use the spare sector, you can postpone buying a new hard drive.

If you use Windows XP, run the MS-DOS Prompt. Type the command "chkdsk / R" and press [Enter]. Command that will make Windows search for bad sectors and positions to restore the data or information which can still be read.

Who knows you're still using Windows 95, Windows 98, or Windows Millennium, try using Scandisk congenital operating system has the option to scan all makeshift repairs.

Is just way faster action you can do if you suspect your hard disk has bad sectors. If I was not successful, try this way.

Use Utilities
You can use devices that can eliminate logic and fix bad sectors. Just so you know, bad sector is divided into two: logic and Physic. Devices that make the hard disk back to work with "remove" the bad sectors.

Hard disks are usually bundled with a software for management functions and improvements. For example, Maxtor and Quantum have MaxBlast, Samsung has ClearHDD, a Seagate Seagate Format, Western Digital Old DLG Diagnostic got, and Fujitsu have a FJ-IDE Drive Initializer Utility.

You are not obliged to wear bundled software. You can also use other devices. Repair hard disk described in this article using SpinRite (www.grc.com). This software made by Gibson Research is quite good for troubleshooting bad sectors on your hard disk. The latest version of this device-6.0-version for U.S. $ 89.

SpinRite supports FAT, NTFS, Linux, Novell, drive with some operating systems and hard disk that has not been formatted. How to use it easy. Staying follow these steps.

1. Create a diskette or CD that can boot. Him in the SpinRite. Click [Create Boot Diskette], [Create an ISO or Image File], or [SpinRite on Install Drive]. Let easy, choose to make a bootable CD. For your information, just walking in the SpinRite DOS mode.

2. After the image file is so, use the CD-burning software, like Nero Burning ROM, to make a CD. Restart the computer and boot with the CD which had just made.

3. SpinRite has the option or level 5. Level that most likely you need is a level 2 or level 4. Action on level 2 is the return of data, while level 4 is the maintenance of drives and analysis. Select course of action you want to do.

4. Whatever level you choose, you will be prompted to select the drive or partition you want to check or repair. After that, look at or change the options of how SpinRite to check your hard disk. If so, continue with the next step of testing the performance of the drive.

Process can run several hours, depending on the capacity and speed of the hard disk. According to information from the manufacturer, the maximum speed SpinRite is 120GB per hour.

However, many things that affect the speed tests, such as damage to the hard disk, support Ultra DMA, or system configuration. Fortunately, you can stop the examination process to continue at a later time. In order not to repeat, simply keep track of position when you stop the examination process.

If SpinRite to detect the need for improvement, SpinRite will work on Level 4 to repair and restore data. Level 4 again takes a long time. Count processing time can be in hours and even days, again depending on the damage.

SpinRite had a screen saver is activated when SpinRite was working. You can also display the processes taking place. If your hard disk supports temperature readings feature, SpinRite will report hard disk temperature information. Hard disk temperature will rise continued when SpinRite improve your data.

When working, SpinRite also have the option to look more closely at the repair process is in progress. The option name is "DynaStat Data Recovery".

If the hard disk is still damaged after the repair with a device like SpinRite, maybe it's time to replace the new hard drive.

Just so you know: Recognize Bad Sector
Bad sector is not a new problem on your hard disk. Case of bad sectors have often emerged from ancient times. Most of the cases that appear bad sector is damaged one or a series of blocks on the hard disk. Damage can be logically or physically. If a physical bad sector is due to physical damage to the hard disk.

Logical bad sector happens not because of physical factors. Factors that led to bad sector is read or write operation is interrupted in some sectors. Interference itself may be caused by viruses, corrupt boot record, the voltage noise, and others.

If this happens, you need software to repair the hard disk is usually a congenital operating system or hard disk itself. Utilities that (hopefully) be able to fix bad sectors that were generated by logic.

The software does not actually fix the broken sector, but just hidden. Damage remains but the operating system to ignore it. How it works roughly like this. The software will restore the hard disk's magnetic orientation to make each byte can be read and written to enable the recovery disk. Improvement devices are usually provided by the manufacturer of the hard disk in question, so it can be used easily and quite helpful in many cases hard disk problems.

In the hard disk, bad sectors can spread and damage the hard disk 0 track because the track does not come formatted. This problem also makes you not able to install or copy the data because it will cause errors.

Problem Solution Disk 3: Disk Health Monitoring


In all PATA and SATA hard drives on the market today, is already embedded features SMART (Self-Monitoring Analysis and Reporting Technology) that specifically detects the hard disk's health. In the SMART parameters were about 30 hard drives health, ranging from temperature, spin-out time, to seek error rate. From this data could be inferred if the hard disk on your PC is still healthy, or already ill.

To read this SMART data, we need specialized applications such as HD Tunes. The main functions of this application is measuring the speed of disk, but can be to read the SMART information, too. HD 15 Tunes will read SMART parameters, with 3 types of results, the current, worst, and the threshold. The definition of each outcome is:

· Current: current state of your hard disk
· Worst: the smallest number ever found in the previous generation hard drives
· Threshold: the limits below which shows the damaged hard drive
· Data: raw data from sensors or counters.

Tip: Visit this site to find out the definition

Harddisk Problem Solution 1: Overcoming the MBR Damage


In the disk, there is a file called the MBR (Master Boot Record). This file is located on the first byte and the first sector of your hard disk; really just the first. Understandably, this is the MBR marker disk presence. If the analogy, the MBR is like a map that leads the BIOS to find hard drive.

But many things can cause the MBR is damaged, such as a virus or accidentally formatted. If that happens, the operating system lost the signpost marked by the emergence of the message Operating System not found or missing operating system on the screen.

The solution of this problem is to restore the MBR file. The most common way is to make the process of recovery from the Windows CD. Way, boot to the Windows CD and select Repair (by pressing the R button) and enter the Recovery Console. After that, type fixmbr command to restore the MBR file.

For Windows Vista, the same concept although the procedure is slightly different. First, boot into Windows Vista DVD and select Repair Your Computer. When the System Recovery Options appears, select Command Prompt. After the Command Prompt window appears, type Bootrec.exe and press Enter.

If the Windows CD either gone anywhere, you can use the application of the Rescue Kit 9.0 Paragon Express artificial. This is a free application that has diverse functions, including restore the MBR. This application is bootable, meaning can be burned to a CD and a source of the boot process. When the system showed signs of loss of MBR, you have to do is boot to the CD containing this Rescue Kit. After that, select Corrector Boot menu, follow the procedures that have been determined, and the case lost MBR should have been resolved.